Introduction
For this guide we're going to use docker compose. Docker compose will allow us to neatly configure all parameters, including setting up separate docker volumes for storing data.
Step 0: Setup Domain Records & Create SSL Certs
See your web hosting service for how to set up A & MX records. For example, DigitalOcean users can follow Digital Ocean's tutorial.
See the SSL Configuration guide to setup SSL if you don't have certificates already.
Step 1: Download docker images
We'll be basing our mail server off of docker-mailserver. We'll also be setting up a web client using rainloop. First step is to download the docker images:
docker pull tvial/docker-mailserver:latest
docker pull krishath/rainloop-ssl:latest
Step 2: Create docker-compose file
Create a file named docker-compose.yml in the root directory of your email project.
In this file, we'll start with the following configuration:
version: '2'
services:
Step 3: Add data volumes
We'll want to store our data in docker data volumes, which will keep them isolated from containers, yet still easily sharable.
volumes:
  maildata:
    driver: local
  mailstate:
    driver: local
Step 4: Add docker-mailserver configuration
We'll be calling our docker-mailserver container mail.
  mail:
    image: tvial/docker-mailserver:latest
    hostname: {your_hostname}
    domainname: {your_domain}
    container_name: mail
    ports:
    - "25:25"
    - "143:143"
    - "587:587"
    - "993:993"
    volumes:
    - maildata:/var/mail
    - mailstate:/var/mail-state
    - mailconfig:/tmp/docker-mailserver/
    - {path_to_ssl}:/etc/letsencrypt/
    - /etc/localtime:/etc/localtime:ro
You'll need to fill in {your_hostname}, {your_domain}, {your_FQDN}, and {path_to_ssl} with your own configuration.
For example, if your domain MX record was pointed to mail.example.com:
{your_hostname}would bemail,{your_domain}would beexample.com{your_FQDN}would bemail.example.com.
Step 5: Add rainloop configuration
We'll be calling our rainloop container webmail. Under services:, add the following configuration.
  webmail:
    image: krishath/rainloop-ssl
    container_name: webmail
    volumes:
    - {path_to_ssl}/etc/live/{your_FQDN}/fullchain.pem:/etc/ssl/cert.pem
    - {path_to_ssl}/etc/live/{your_FQDN}/privkey.pem:/etc/ssl/cert.key
    - {path_to_ssl}/dhparam.pem:/etc/ssl/certs/dhparam.pem
    - webmaildata:/webapps/rainloop/data
    - /etc/localtime:/etc/localtime:ro
    ports:
    - "443:443"
Step 4: Bring up the containers
Now that everything should be configured correctly, bring up the docker containers with:
sudo docker-compose up -d
The -d option starts the containers in the background.
You can stop the containers at any time with sudo docker-compose down.
Step 5: Verify everything is working
Now confirm that the containers are running pointed to the correct directories with:
docker inspect mail
This will inspect the mail container we brought up with docker-compose. You should see the volumes you created references under "Mounts".
Also confirm that we can connect to the mail server using ssl:
openssl s_client -showcerts -connect {your_hostname}:993
Step 6: Create an email account
Use the setup script to add an email account to your new mail server:
./setup.sh -c mail email add email@example.com
Step 7: Connect to your mail server using rainloop
 Try to connect to your webserver's admin page. i.e.
 https://webmail.example.com/?admin After you login use the default username and password (admin, 12345), immediately change the admin password to something more secure (under "Security").
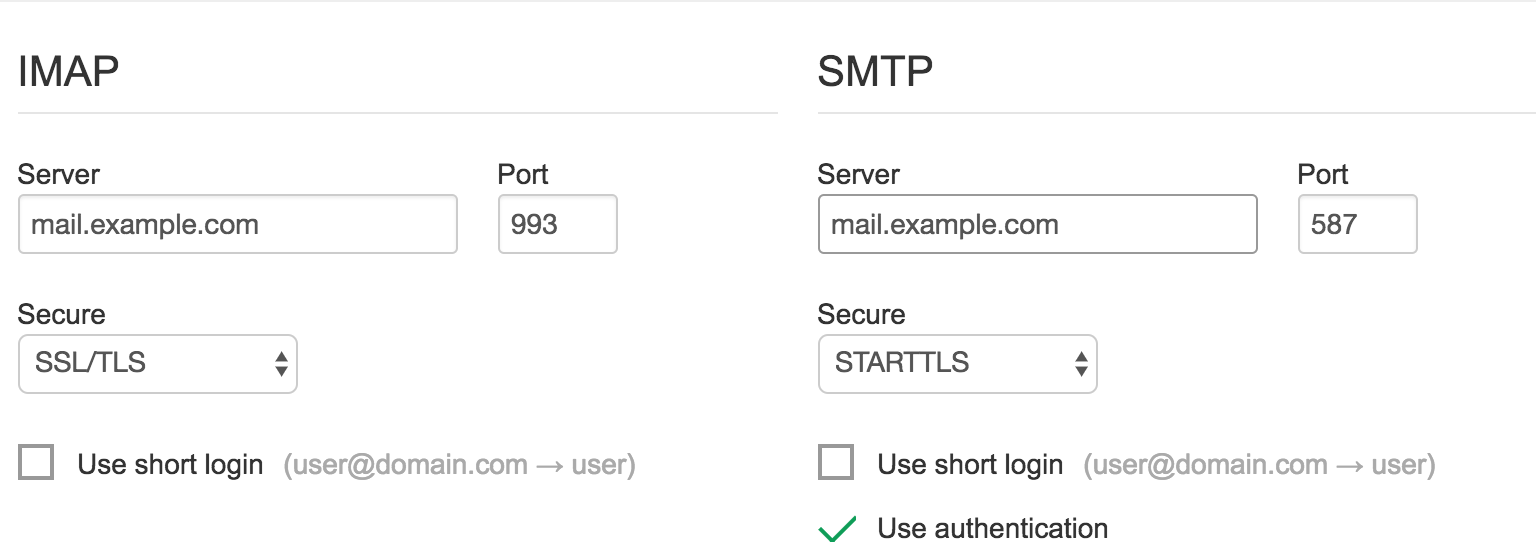
Now, Setup the connection to your mail server by adding a new domain (under "Domains").
Test the configuration - at this point, you should be able to go to login to your email using `https://webmail.example.com/.